
How To Make Crown Riser Molding
With the current trend of running cabinetry to the ceiling, it’s good to know how to make crown riser molding.
Whether you’re installing new cabinetry or upgrading an existing kitchen or other areas, there are times when a crown riser (also called riser molding or starter molding) makes sense.
In this article, we’ll go through the easiest and fastest way to make a basic crown riser molding that will act as a filler, close a gap on the top of your cabinets, or add another molding level to your cabinetry. I use this method often. It doesn’t take long, and with some planning, you’ll have a riser on your cabinets in no time.
Are you ready to dig in?
What is Crown Riser Molding?
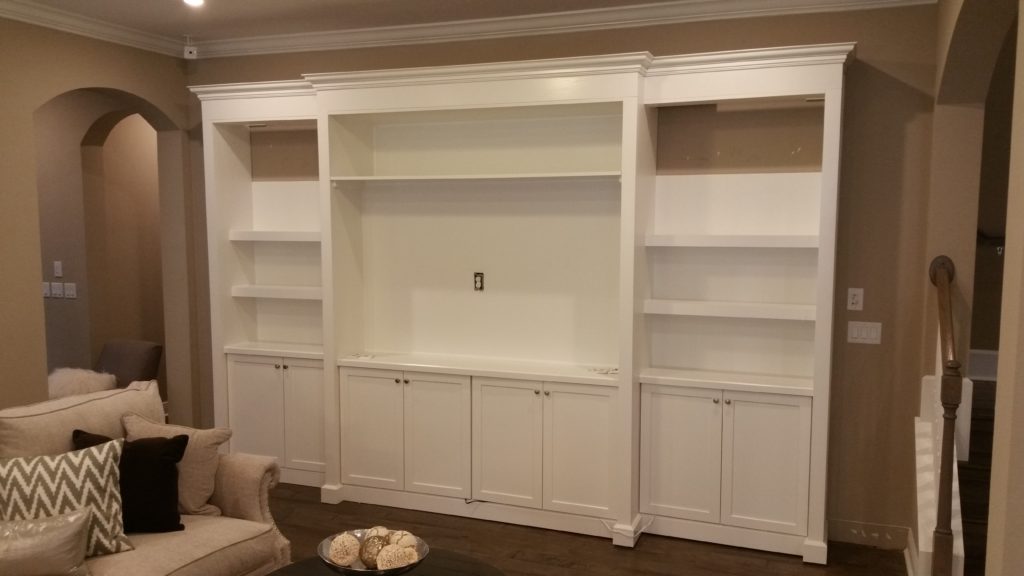
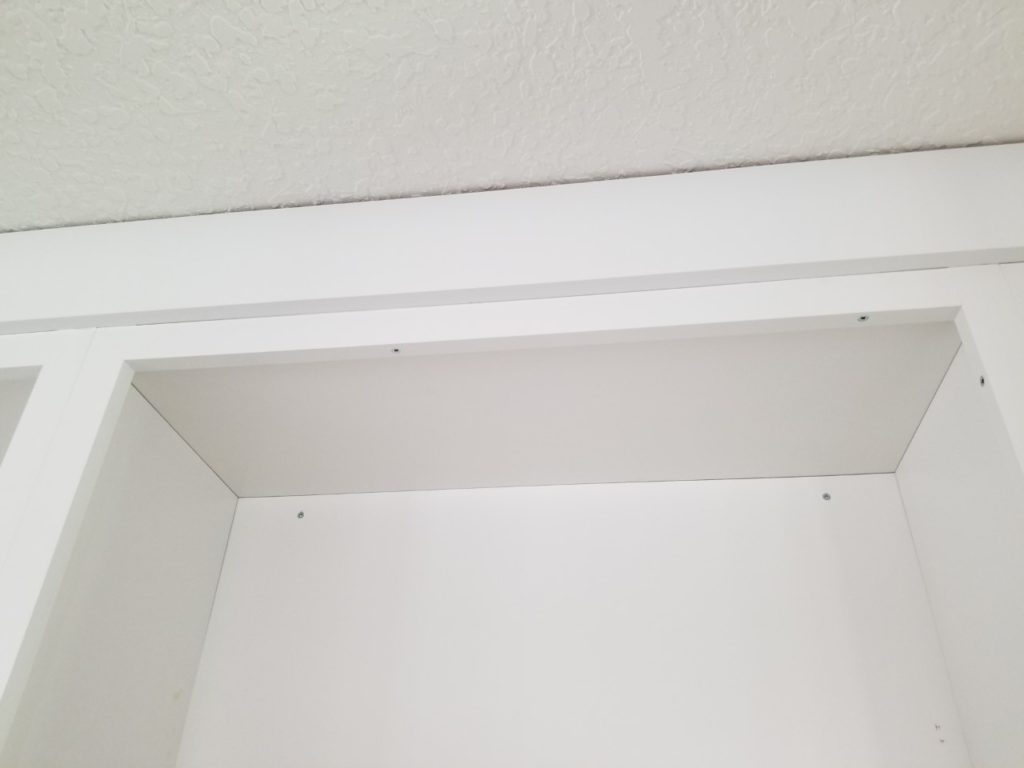
The best way to explain it is with the below above. It’s the molding on top of the cabinets where the crown molding attaches to. That’s all. It doesn’t have to be fancy or complicated; it can be, but this simple, straightforward design works just fine.
When Should you use Crown Riser?
There are really only two applications for crown riser molding. The first is to fill a space above the cabinets that the crown alone won’t fill, so the cabinetry goes to the ceiling. The above picture is an example of this. The second is purely aesthetic. It’s a simple way to dress up cabinetry.
Here’s a good example:
Most cabinet manufacturers have crown riser options, and by all means invest in these if you’re looking for something more detailed, but in both above pictures, you can see that a simple, flat piece of trim adds a whole new dimension to the cabinets.
Here’s how to build it.
Determine the Material you Need
Crown riser is very simple to make. Even better, there are only two different sizes of material needed to make it, and one of them always stays the same!
But before anything is purchased, the width of the other material, the “face” board, must be determined. This is extremely important. Fortunately, it’s also straightforward. All that’s required is the distance between the top of the cabinets and the ceiling.
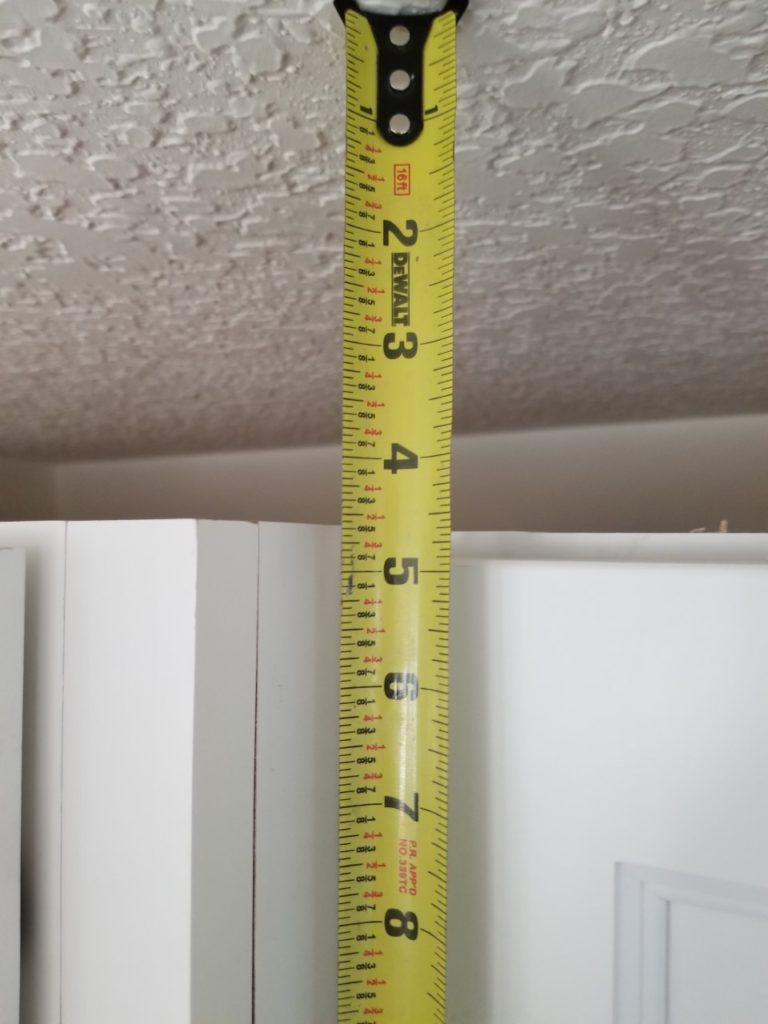
If you have existing cabinets, simply measure the gap between the top of the cabinets and the ceiling, like this:
Easy enough, right? But let’s say your cabinets aren’t installed. How do you get this measurement?
Break out the tape measure and measure floor to ceiling where the cabinets will go. Do this in a few different spots. Chances are the measurements will vary a little, maybe a half-inch or so. All this means is that either the ceiling or floor (or both) aren’t level. Don’t worry; I’ve never seen one that is. For our purposes, use the smallest measurement.
Now that ceiling height is established, how high do the cabinets go?
Again, not difficult to determine. The bottom of wall cabinets are set at 54″. If you have 30″ wall cabinets, the top would be 84″. If you have 42″ wall cabinets, then the top would be 96″. Whatever size you have, add 54″.
Let’s say we have a ten-foot ceiling; it’s supposed to be 120″, but the smallest measurement is 119 5/8″. And the top of the cabinetry is 114″. That’s a 5 5/8″ gap.
We need material that’s 6″ wide. That will be the “face” board of the riser, the piece the crown attaches to. It will need to be cut down to fit. The other board, the “bottom” board, the piece that attaches to the cabinet, is always 3/4″ x 3″ cabinet filler (or 1″ x 4″ dimensional trim).
So, the two types of material needed to make the riser in the above situation are:
- 3/4″ x 6″ cabinet filler material (or 1″ x 6″ dimensional trim) for the “face” board
- 3/4″ x 3″ cabinet filler material (or 1″ x 4″ dimensional trim) for the “bottom” board
(*It’s important to note that this varies depending on the measurement between the top of the cabinets and the ceiling. If the gap was smaller, say 3 1/2″, then 3″ material could be used all around. If the gap were bigger, then wider material would be needed.)
The only thing left is to figure out how much material is needed for the riser.
To do this, physically measure everywhere the riser molding will go or use the kitchen layout print. Also, the material will come in 96″ lengths. You must account for this and any cuts needed to fit the riser.
Now, you won’t need as much 3″ material as 6″ material. Why? Because it will be ripped into 3/4″ strips. (You’ll see what I mean below.) Order half of what was figured for the 6″. If you need six pieces of 6″, order three pieces of 3″.
Okay, the riser material has been figured.
Now, not only does the amount of crown molding need to be worked out but its size must be determined. The amount is simple; order the same amount as the “face” board, plus one additional piece. The extra piece should account for the miters needed to fit the crown.
But the size can be more complicated. Again, the smallest measurement is needed from the top of the cabinets to the ceiling. I recommend getting crown molding that’s at least 1″ smaller than that measurement. It allows for a bigger reveal (the portion left exposed) on the “face” board after the crown is attached.
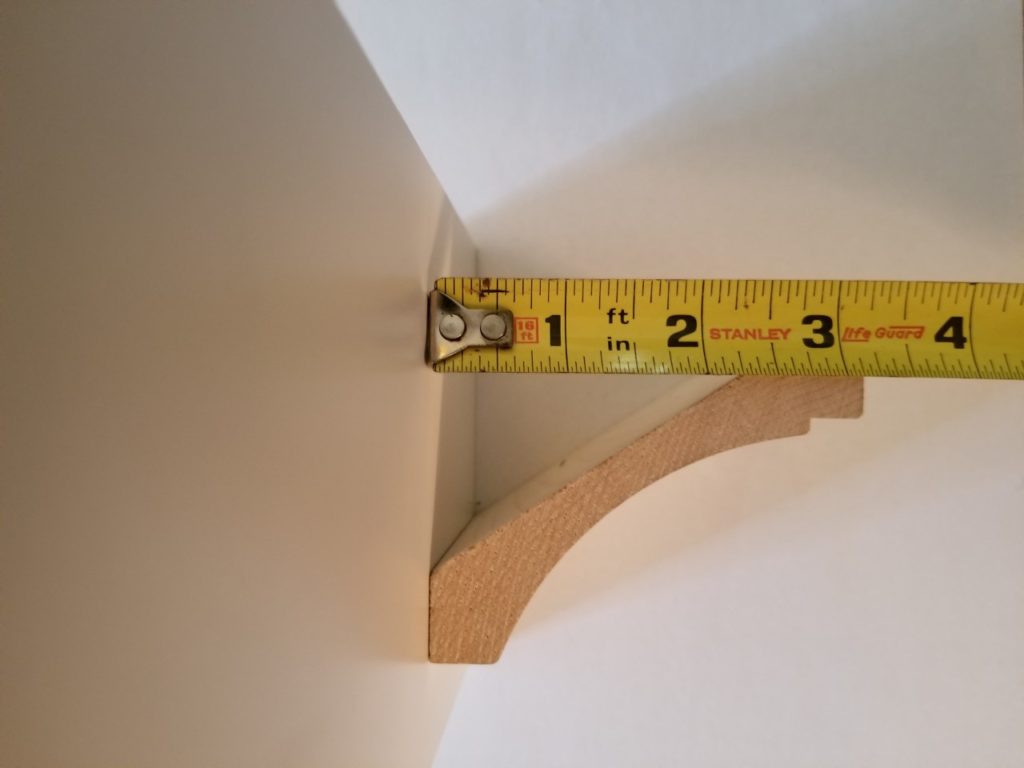
How do you measure crown molding to determine its size? Like this:
Once the amount of material and the crown molding size is established, the key is getting material that matches your cabinetry (that’s where the planning comes in). Most of the time, I have extra cabinet filler material added to the original cabinet order. Typically, I figure out the linear footage and add an extra piece or two (I do this to avoid being short in case of damage).
What if it’s a Remodel and you Aren’t Able to Order the Material With the Original Cabinet Order?
No problem. You can get around this by matching the paint color at a home center or paint store.
Just buy your riser molding material (see above to determine size) and crown, and either paint it yourself or have a painting contractor do it for you. Remove a cabinet door; the smaller, the better, and take it to a home center or paint store. Many of these have scanners that can reproduce the color. While you’re there, ask if there is a finish on the cabinet door, like catalyzed lacquer.
If there is, you want to add it to your trim. Check out this article from Wood magazine. (Side note, if you’re a DIYer, carpenter, painter, or woodworking enthusiast, pick up a copy of Wood Magazine.)
Once you have everything painted, you’re ready to start building the crown riser.
Step #1: Rip Down Your Material
As mentioned above, rip the 3/4″ x 3″ material into 3/4″ wide strips by running them through a table saw.
You’ll be left with 3/4″ x 3/4″ x 96″ strips. These will be used as your “bottom” boards and will be fastened to the top of the cabinets. Put them aside for now.
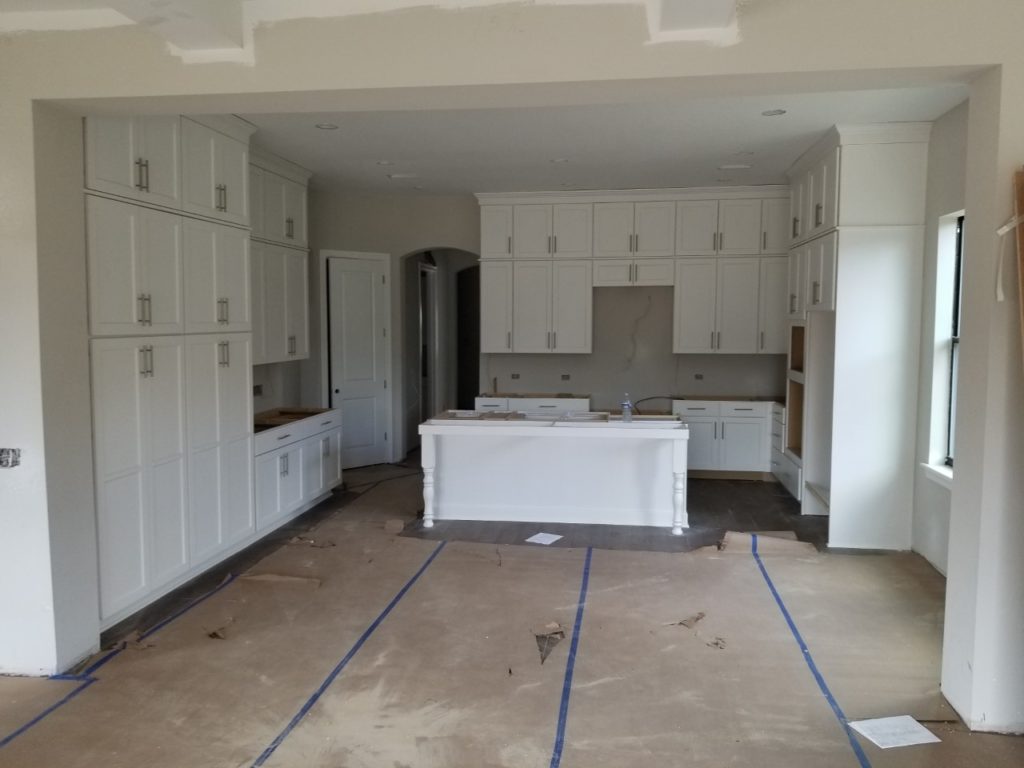
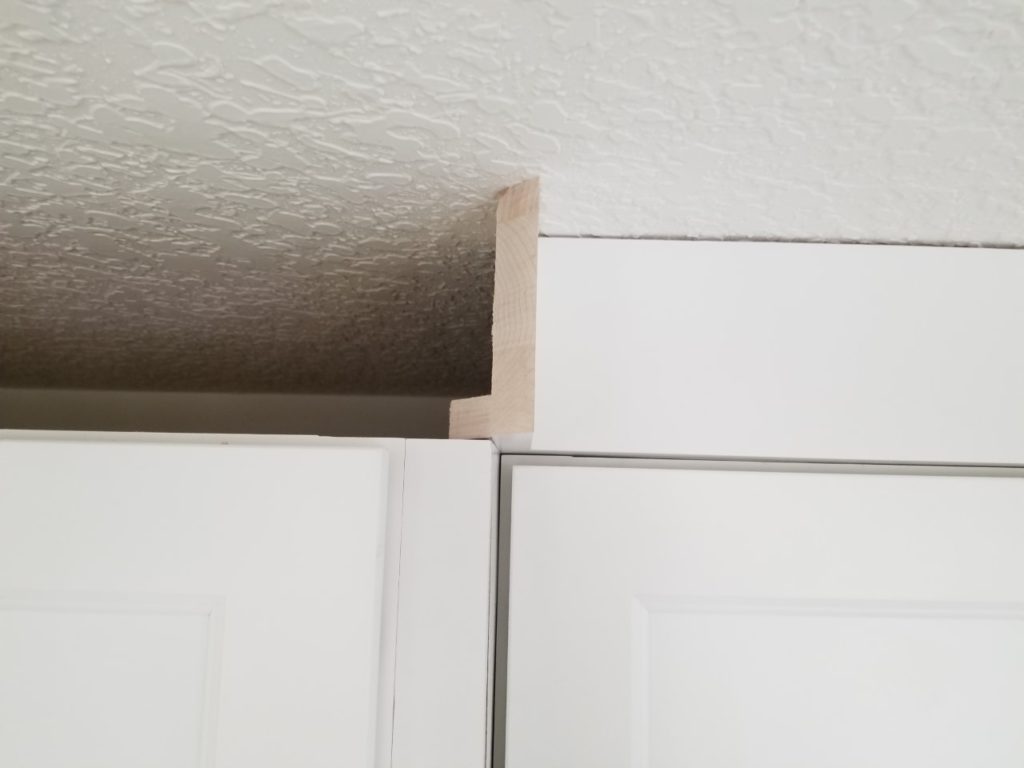
Next, rip down your “face” boards to the smallest measurement between the top of the cabinets and the ceiling. A caution note here: when installing crown riser in multiple places where the upper cabinets don’t touch one another, use the smallest measurement for each section. The picture below shows this.
Step #2: Assemble Your Crown Riser
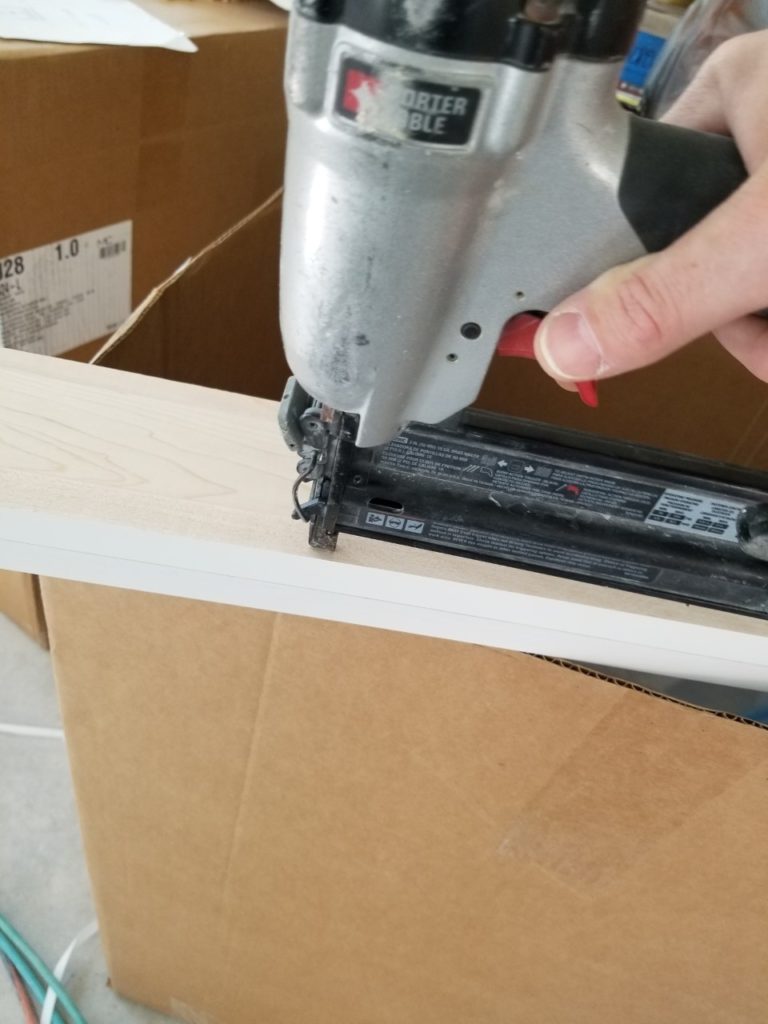
This process is simple. First, lay your “face” board on something flat with the finished side (the side you want showing) down.
Next, place a 3/4″ x 3/4″ strip flush with the bottom, with the cut side facing up. Finally, nail through the back of the strip with 1 1/4″ nails to secure it to the “face” board. Here’s a picture of the process:
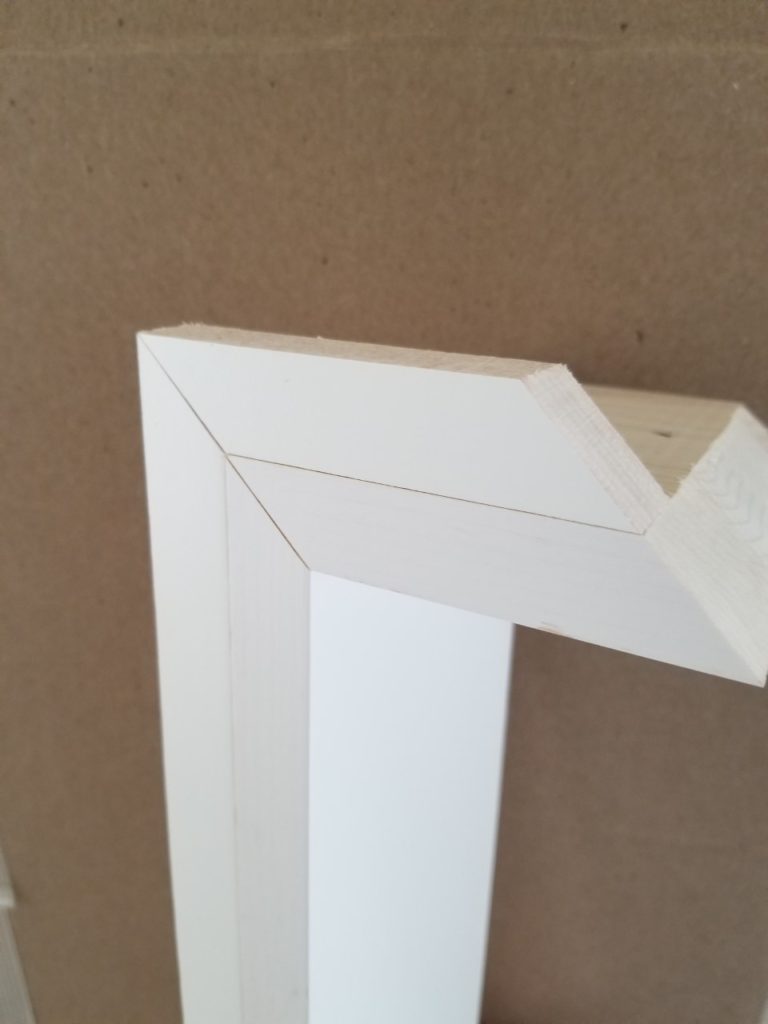
This is what the finished product looks like from the side.

Step #3: Attaching the Riser to the Top of the Cabinets
When attaching a riser to cabinets, I’ve always found that screwing it through the inside top of the face frame works best.
You can set the screws and putty over them if desired. Use a 3/16″ bit and drill straight through the top of the face frame. Cut your riser to length, leave the “face” board fully exposed (a 3/4″ reveal should be visible), and screw up into the hidden “bottom” board, like this:
That’s it. Install all the crown risers throughout the kitchen with this method. If you’re having trouble holding the riser while you screw it, slide a thin painter’s bar between the riser and the ceiling to apply light pressure.
When fitting an inside corner, glue and pre-nail your pieces from the back for a stronger hold, like this:
Step #4: Install Crown Molding
There’s more than one school of thought on doing this. Some people like to push the crown to the ceiling so there are no gaps above it, and others prefer to keep the reveal equal between the bottom of the crown and the face board. What do i mean by this? Check out this picture:

When you do this, there’s a chance of gaps above the crown molding where the ceiling is unlevel. There are two ways to fix these gaps.
- Caulk the gaps if they aren’t too big (under a 1/4″ or so). Or, if they are big (1/2″), fill the gaps with a backer rod (foam strips pushed in gaps to control the amount of sealant or caulk), then caulk and paint the same color as the ceiling. All the major home stores sell it.
- If the gaps are enormous, “float” your ceiling with joint compound. This can be complicated, and contacting a drywalling contractor is recommended.
It’s Time to Dig out the Tools
You just learned how to make crown riser molding, and the best way to try out your new skills is to dig out the tools and get to work.
Imagine how satisfying it will feel to stand there and look up and see what you did. After all, not everyone can install a kitchen, let alone plan for, build and install crown molding riser.
If you have questions, are a designer, small builder, or distributor in Tampa, Florida, and are looking for cabinet installation, please contact me.
Copyright Blackburn Custom Woodworking, Inc. 2023