")
Installing Hidden Walk-in Pantry Cabinets (+How To Build Them)
Hidden walk-in pantry cabinets are becoming more common, and it’s understandable why; they add a unique dynamic to any kitchen.
Although the idea of “hiding” rooms or other spaces with cabinetry dates back ages, this simple idea has expanded from custom cabinetry into ordinary, everyday kitchens. And because of its growing popularity, several well-known cabinet manufacturers have designed a specific pantry walk-through cabinet for this purpose (see bottom of article for a list).
The only downside is installation can be tricky.
But don’t worry, everything you need to know about installation and a bonus section about how to build your own with standard cabinet parts is covered below.
Are you ready to hang some cabinets?
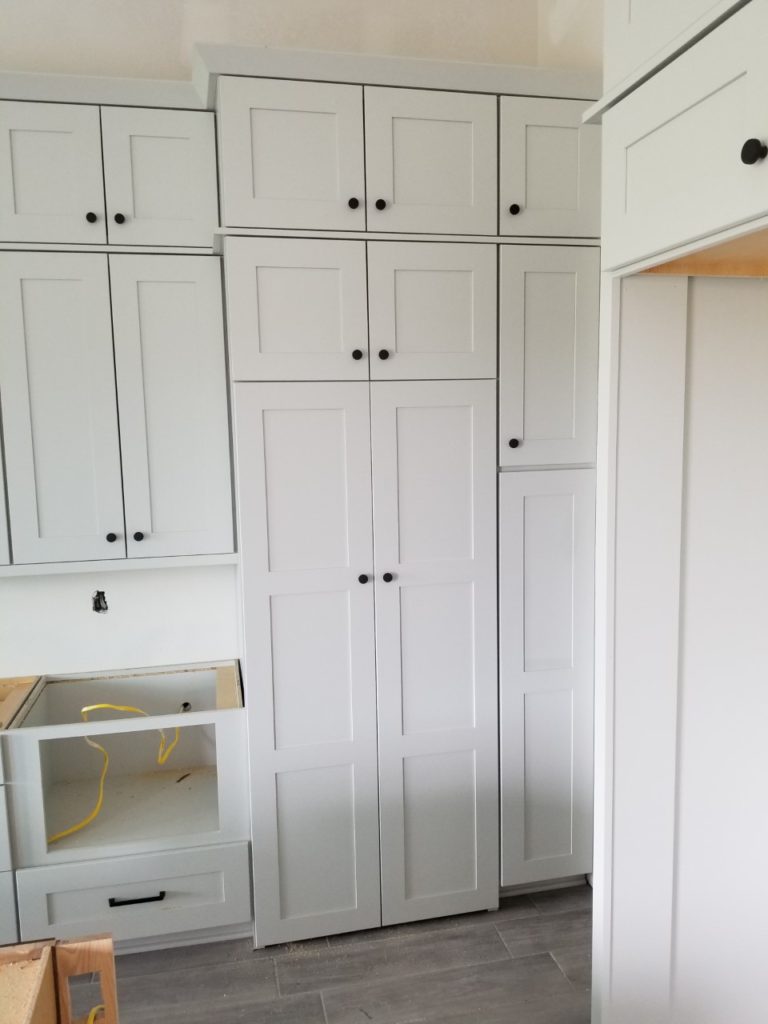
Installing Pantry Walk-Through Cabinets
Planning is the trick to installing a walk-through cabinet (also called a pass-through cabinet).
This may seem obvious, but it’s essential if load-bearing walls are involved.
A walk-through needs to be centered around an opening. Because of this, the cabinetry must be laid out before any cabinetry can be ordered. If the wall isn’t load-bearing, there is some flexibility. A jack stud may be added or removed to even up the opening. But if the wall is, in fact, load-bearing, the careful layout of the surrounding cabinetry is a must. Here’s what I mean:

Add a Spacer at the Bottom When Installing
This is also important. Installation is relatively easy by adding a spacer at the bottom of the cabinet (see the example in the above picture).
Some cabinets come with the spacer already attached. The above example did, but always make sure that the opening is correct. Nothing will slow down an install faster than ripping out previously installed cabinets because an opening is wrong.
Level and Plumb the Walk-Through Cabinet
Again, this may seem like a no-brainer, but taking extra time on this step is well worth it.
There are a few cabinets that should always be both level and plumb. Besides refrigerator and oven cabinets, a pantry walk-through cabinet is one of them. Doors must line up both side to side and front to back. Check and double-check this before moving on.
Surrounding cabinetry ties everything together
Nailing spacers to the sides of the connecting cabinets will prevent movement of the insides of the walk-through cabinets.
In the picture below, the connecting cabinets would be the upper wall cabinet to the left, the lower microwave cabinet to the left, and the pantry cabinet to the right. Nailing “deadwood” strips to the sides of these cabinets that touch the pass-through make for easier overall attachment of cabinetry to each other.

Nail the deadwood strips to the sides of the cabinets before installing adjacent cabinetry like this:
Can a Pantry Walk-Through Cabinet be Built From Scratch?
Yes. As long as the pantry doors are available from the cabinet manufacturer, can be custom-made by a shop, or you have the proper tools to build them yourself, constructing a pantry walk-through cabinet is easy. But make sure you know the height of your wall cabinets.
This is what I would use for a kitchen with 42″ upper cabinets:
- Two 96″ high x 24″ deep refrigerator end panels with 1 1/2″ face frames (these are available from virtually any cabinet manufacturer)
- A 36″ wide x 18″ high x 24″ deep wall cabinet. This will provide an open that is 36″ wide by 78″ high while still providing a cabinet for storage
- A 48″ x 48″ panel or “skin” (this is typically a 1/4″ thick sheet applied to the outside end of a cabinet behind the face frame). This is used underneath the cabinet to give the bottom a finished look.
But a kitchen with 30″ upper cabinets gets a little tricky. An upper cabinet couldn’t be used to achieve the same headroom, 6’6”. I would order this instead:
- Two 84″ high x 24″ deep refrigerator end panels with 1 1/2″ face frames
- Two 6″ wide x 42″ long x 3/4″ thick pieces of filler material (one is to be cut to 36″ long)
- A half sheet (48″ x 48″) piece of 1/2″ plywood
- A 48″ x 48″ panel or “skin”
Assembling the Pantry Walk-Through Cabinet
Now it’s time to assemble the parts. For the first situation (42″ wall cabinets), we’re simply laying the cabinet on its back, adding spacers to both sides, and attaching the 96″ tall refrigerator end panels. Here’s what I mean:

For the second situation, the example with 30″ cabinets, we are essentially doing the same thing. The only difference is a filler is used and not a cabinet. The plywood acts as a “top” and helps hold everything together. At the same time, the panel covers the plywood, so the colors match.
The only trick here is attaching the 6″ wide x 36″ long filler between the two panels. Here’s a drawing of how I do this:

As denoted in my drawing, this view is from the top looking down, like the picture above). It’s much easier to assemble it on the ground before installing it. Let’s go through my process step-by-step.
- Cut one of the two 6″ x 42″ fillers to 36″
- Cut the backer filler so the length spans inside the refrigerator end panels and the 36″ filler like in the drawing. Typically, there is a 3/4″ overhang behind the refrigerator end panel’s 1 1/2″ face frame. There’s two of them, so the overall length of the backer filler, in theory, should be 37 1/2.” Make it smaller by 1/8″
- Lay the end panels down and hold the 36″ filler between the panels flush with the top (this is much easier with two people)
- Tuck the backer filler behind the 6″ filler, make sure the 6″ filler is in position, then nail through the back of the back filler on both ends into the end panels with 1/14″ nails. Secure the 6″ filler by nailing through the back of the back filler in several places. Nailing through the back will make no nail holes visible in the face
- Once the panels and fillers are installed, measure and cut the plywood to fit in the “open space.” Attach it by nailing through the sides of the end panels and toe nailing into the backer filler through the top of the plywood
- Measure and cut the 48″ x48″ panel, apply construction adhesive or caulking to the back of the panel, and pin-nail it on the underside of the walk-through to give the bottom of the cabinet a finished look
- Install the walk-through cabinet as mentioned above
Attaching the Doors
If you purchased a walk-through cabinet, it would come with doors. If not, you would have to acquire them in one of the ways listed earlier. Either way, the doors need to be installed. The finished product should look something like this:
Be patient when installing the doors.
The last thing you want is to keep screwing and unscrewing the hinges. I avoid this by ensuring the hinges are pre-attached to the doors so I can hold them up and screw them into the face frame. I hold one of the doors where I want it, set my foot under it, then screw in the top hinge and one other (most of these doors have four hinges).
I then close the door, note gaps, measure where I placed the top screw, and mark it on the other side. Screw the second door’s top and one other hinge, close both doors, make adjustments, and finally put a screw in all the hinges.
That’s the easiest way I’ve encountered to install doors.
And as promised, here’s a list of manufactures.
Cabinet Manufacturers That Make Pantry Walk-Through Cabinets
It’s noteworthy to mention that all of the below cabinet manufacturers are owned by the same mother company, MasterBrand. MasterBrand cabinets and all its sub-companies are readily available through distributors and home improvement stores. They make excellent cabinets and are a wise choice for any cabinet application. Besides the links below, here’s a direct link to MasterBrand.
It’s Time to set up the Tools
Remember, hidden walk-in pantries can be tricky.
If all the above steps were followed, there should be no problems. Before you begin, it’s a good idea to layout your cabinets on the wall and ensure your pass-through cabinet lines up with the framed opening.
And remember to install a spacer and keep your pass-through cabinet plumb and level. This may take longer than planned, but it’s time well spent. Ripping out cabinets can be expensive and frustrating.
It’s not an overly complicated task; it’s just one that takes more planning than usual.
If you have any questions, are a designer, small builder, or distributor in Tampa, Florida, and are looking for cabinet installation, please contact me.
Copyright Blackburn Custom Woodworking, Inc. 2023